![]()
The Catalog and Index Files
Note: Be sure that your Web server is running Indexing Service 3.0. Earlier versions of the service do not work properly.
The Microsoft Windows Indexing Service uses catalogs to index Ektron CMS400.NET content. The catalogs read copies of content that are saved to the local file system whenever they are published.
Local Index Files
A separate copy of all published content is maintained in local index files (whose extension is .txt), which are stored in the siteroot/assets folder. Within that folder is a reproduction of the CMS folder structure. However, it uses the folder ID number, not name, to represent folders. The following graphic illustrates this structure.
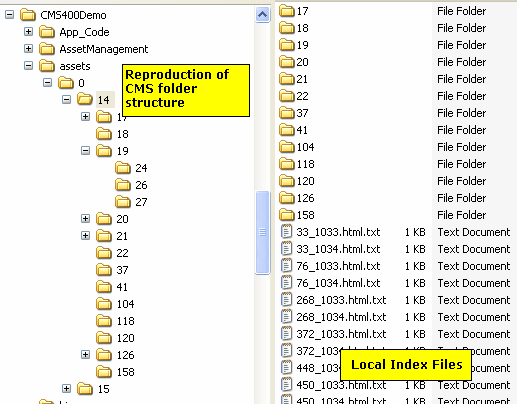
Notice that each content item is saved as a .txt file for indexing. The file name is derived from the content item’s
ID number
underscore (_)
language ID
file extension (content items have an .html extension)
.txt file extension
The Catalogs
Ektron CMS400.NET stores a copy of all published content in two catalogs that can be queried. Their default names are below.
siteroot uniqueID Private
As indicated, the second catalog stores private assets. See Also: Private Content
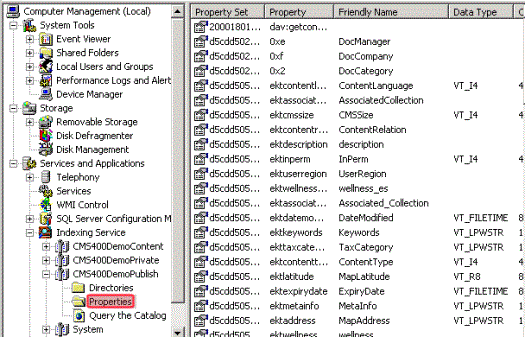
To access these catalogs within the indexing service, go to Computer Management > Services and Applications > Indexing Service.
Within the file system, these catalogs reside in the c:\program Files\Ektron\Catalogs\siteroot unique identifier folder. For example, C:\Program Files\Ektron\Catalogs\CMS400Min312007131255.
View a catalog’s properties to see the fields you can use in queries. See Also: Property Value Queries
Changing a Catalog’s Name
To change a catalog’s name, open the siteroot/web.config file with an editor such as Notepad. Then, update the catalogName element for the published catalog name, and the privateCatalogName element for the private catalog name.
<webSearch defaultProvider="MSIndexDialectServer">
<providers>
<add name="MSIndexDialectServer" type="Ektron.Cms.WebSearch.SearchProviders.MSIndexDialectProvider, Ektron.Cms.WebSearch" catalogName="localhostPublished" privateCatalogName="localhostPrivate" pageSize="10" description="MS Index Server Dialect2 Provider"/>
<add name="MSIndexServer" type="Ektron.Cms.WebSearch.SearchProviders.MSIndexProvider, Ektron.Cms.WebSearch" catalogName="localhostPublished" privateCatalogName="localhostPrivate" pageSize="10" description="MS Index Server SQL Provider"/>
</providers>
</webSearch>
Recreating a Catalog
If a catalog is accidentally deleted or becomes corrupted, follow these steps to recreate one. There are two ways to do this.
Automatically Recreating a Catalog
Manually Recreating a Catalog
Part 1: Create a New Catalog and Copy Metaconfig.doc File to it
1. Open the C:\Program Files\Ektron\Catalogs folder.
2. Create a folder for the new catalog.
3. From the Computer Management screen, select Services and Applications > Indexing Service.
4. If the indexing service is running, right click Indexing Service and click Stop.
5. Right click the mouse and select New > Catalog.
6. Assign the catalog a name. At the Location field, browse to the folder you created in Step 2.
7. Navigate to the C:\Program Files\Ektron\CMS400releasenumber\Utilities directory and find the metaconfig.doc file.
8. If you are creating a public catalog, copy that file to the site root/Assets folder.
If you are creating a private catalog, copy metaconfig.doc to the site root/PrivateAssets folder.
9. From the Computer Management screen, click the new catalog you created in step 5. Underneath it, a Directories folder appears.
10. Select the Directories folder and click New > Directory.
11. The Add Directory Screen appears. If you are creating a public catalog, browse to the site root/Assets folder. If you are creating a private catalog, browse to the site root/PrivateAssets folder.
12. Right click Indexing Service and click Start.
13. From the Computer Management screen, view the new indexing service. Make sure a number appears in new catalog’s Total Docs column, and the Docs to Index number is zero (0) before proceeding.
Part 2: Update Metaconfig.reg
1. Navigate to the C:\Program Files\Ektron\CMS400releasenumber\Utilities directory
2. Open the metaconfig.reg file with an editor like Notepad.
3. Update the first line of that file with the location of the new catalog relative to the C:\Program Files\Ektron\Catalogs folder. For example, if the new folder within the catalog folder is named mytest, the first line of the metaconfig.reg file looks like this.
[HKEY_LOCAL_MACHINE\SYSTEM\CurrentControlSet\Control\ContentIndex\Catalogs\mytest\Properties]
4. Save the file.
5. Double click the file. This action updates your Windows Registry with the new information.
6. Stop and restart Windows Indexing Service. Both commands are available from the menu that appears when you hover over the Indexing Service and right click the mouse.
7. View the new Indexing Service to verify that all properties exist as in the original service.
Part 3: Update web.config
Follow the directions in Changing a Catalog’s Name to update the catalogs that are updated as content is updated.
Automatically Recreating a Catalog
If you don’t want to perform the manual steps listed above, Ektron CMS400.NET provides a utility that automatically creates a new catalog. You would typically use this if a catalog were corrupted or accidentally deleted.
Warning! Before running the Search Data Configuration utility, if your server has Visio documents, install the Visio IFilter. See Query Language. Also, if your server has Office 2007 documents, install the Microsoft Office SharePoint Server 2007 IFilters. See http://technet2.microsoft.com/Office/en-us/library/c6c029bd-64ea-4617-b2da-c269f13599e21033.mspx?mfr=true.
Warning! Make sure all Ektron CMS400.NET users are signed off before you begin this utility. If they are not, the utility logs them off.
To launch the utility, follow this path from the Windows Start button: Start > Programs > Ektron > CMS400 version > Utilities > SearchConfigUI
Alternatively, click the following file: C:\Program Files\Ektron\CMS400vversionnumber\Utilities\SOFTWARE\SearchConfig\searchconfigUI.exe
When you do, the following screen appears.
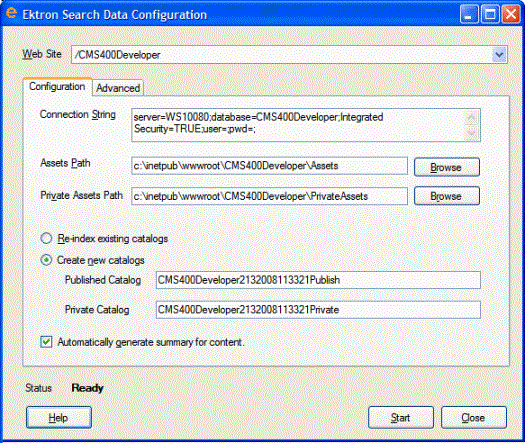
To create a new published asset catalog, follow these steps.
1. In the Published Catalog field, enter the name of a new catalog. Or, leave the current catalog name, and the utility will overwrite the catalog.
2. Do the same to create a new or replace the Private Catalog.
3. Check the Create New Catalogs box.
4. If you want to automatically generate a summary for all content in the new catalog, click the Automatically generate summary for content checkbox. See Also: Automatic Creation of a Summary
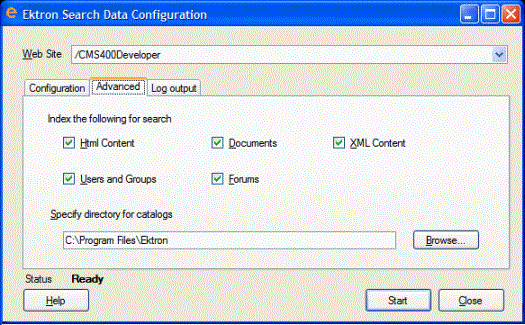
5. Click the Advanced tab.
6. Check each type of content that you want to index for the search.
7. By default, new catalogs are created in the web site root/ catalogs folder. If you want to create these in another folder, use the Specify directory for catalogs field to enter or browse to that folder.
8. Press Start.
9. Ektron CMS400.NET creates a new catalog and index files for your content.
After you run this utility, the old catalog remains but no new content is written to it. All subsequent changes are written to the new catalog.
See Also: SearchConfigUI.exe crashes while building search indexes and catalogs
The SearchConfig Log
All activity generated by the Search Data Configuration screen is tracked by a log. You can view the log top obtain a history of these changes.
The log is located in the C:\Program Files\Ektron\CMS400versionnumber\Utilities\SOFTWARE\SearchConfig folder. Its name is date time.LOG. The log is also available on the Search Data Configuration Screen’s Log output tab.
Search Data Configuration Screens
Use these screens to perform the following actions.
make all Ektron CMS400.NET content searchable (do this if you recently switched to a new database)
make any of the following kinds of content searchable (do this if the search cannot find this content)
- HTML
- assets
- XML Smart Forms
- users and groups
- forums
reindex the catalogs
create a new catalog and index it (do this if a catalog was corrupted or accidentally deleted)
The following table explains the fields on the screens.
See Also: The SearchConfig Log
The Configuration Tab
See Screen Sample
|
Field |
Description |
|
Web Site |
Select the Ektron CMS400.NET site that you want to work with |
|
Connection String |
Review the connection string to your Ektron CMS400.NET database. Update if needed. |
|
Assets Path |
Review the path to your site’s Assets folder. Update if needed. |
|
Private Assets Path |
Review the path to your site’s Private Assets folder. Update if needed. |
|
Re-index existing catalogs |
Check this box if you want to reindex the existing catalogs. |
|
Create New Catalogs |
Check this box if you want to create a new catalog. |
|
Published Catalog |
Review the name of your published catalog. Update if needed. See Also: The Catalogs |
|
Private Catalog |
Review the name of your private catalog. Update if needed. See Also: The Catalogs |
|
Automatically Generate Summary for Content |
If you want to automatically generate a summary for all content in the new catalog, click this checkbox. See Also: |
|
Status |
After you click the Start button, this area indicates the status of the new catalog creation. |
The Advanced Tab
|
Field |
Description |
|
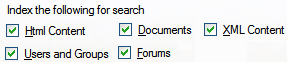
Index the following for Search Html Content Users and Groups Documents Forums XML Content |
Check each type of content that the search can find. |
|
Specify directory for catalogs |
Use this field to change the location of the published and private catalogs, if desired. By default, they reside in the your web site/catalogs directory. |
The Log Output Tab
All activity generated by the Search Data Configuration screen is tracked by a log. The Log Output Tab displays a history of these changes.
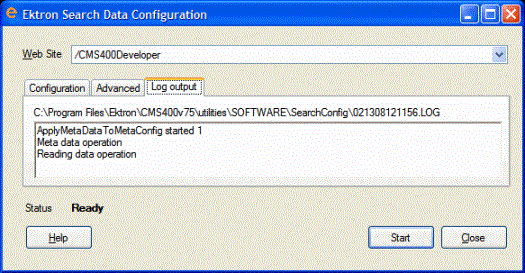
A permanent copy of the log is saved in the C:\Program Files\Ektron\CMS400vversionnumber\Utilities\SOFTWARE\SearchConfig folder. Its name is date time.LOG.
Restarting the Indexing Service
Use the Indexing Service screen to restart Windows’ Indexing Service. You can also use the screen to rescan the catalogs.
To access the Indexing Service screen, go to Workarea > Settings > Configuration > Indexing Services.
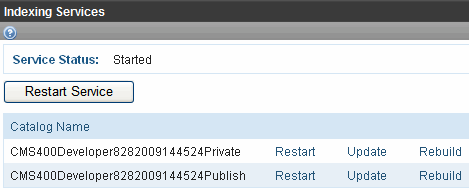
From this screen, you can
Run an Incremental Scan of a Catalog
Restart the Indexing Service
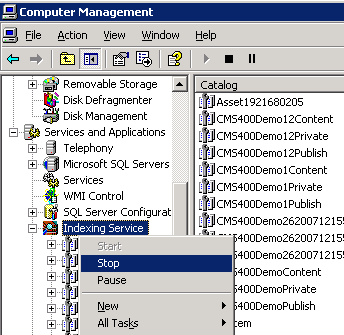
Sometimes, when resolving issues with your search, you must stop and restart the indexing service. To restart it via the Indexing Service screen, click Restart Service.
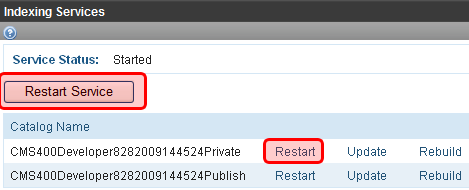
To restart the indexing service for a particular catalog only, click Restart to the right of the catalog name.
Alternatively, you can stop and restart the Indexing service from the Computer Management screen, as shown below.
Run a Full Scan of a Catalog
Sometimes, when resolving issues with your search, you need to run a full scan of a catalog. To do this, access the Settings > Configuration > Indexing Service screen. Then, click Rebuild next to the affected catalog.
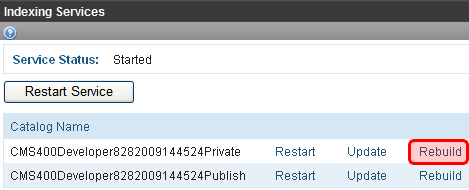
The following text explains the full scan. (Copied from Microsoft Management Console help)
A full scan takes a complete inventory of all documents in the cataloged folders and adds them to the list of documents to be indexed. The Indexing Service does a full scan of disk drives attached to your computer (except for removable devices) in the following situations:
When it is run for the first time after installation
When a folder is added to the catalog
As part of recovery if a serious error occurs
Run an Incremental Scan of a Catalog
Sometimes, when resolving issues with your search, you need to run an incremental scan of a catalog. To do this, access the Settings > Configuration > Indexing Service screen. Then, click Update next to the affected catalog.
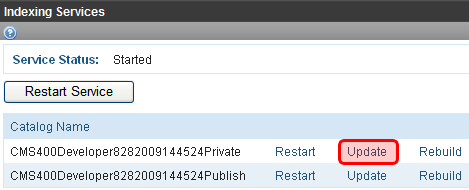
The following text explains the incremental scan. (Copied from Microsoft Management Console help)
Microsoft Windows Indexing Service cannot track changes to documents when it is shut down. When Indexing Service restarts, it does an incremental scan to detect all documents that were modified while it was inactive so it can update its index.
An incremental scan may also be performed if Indexing Service loses change notifications. This can happen if the update rate of documents is very high and the buffer used to get change notifications from Windows XP overflows.


![]()